ITEMS NEEDED
- Tablet
- Tablet Pencil
- Laptop or Desktop PC
- HASI instructions
Ensure any clocks are not visible in the testing room/location including a participant’s watch if it shows an analogue clock.

If the client has already been entered into the system, find their record and click on the ‘Run Test’ button on the row of their record. If the buttons for each row are not visible, they can be accessed by clicking the green/white + on the relevant row.
If the client is new, click the ‘Add Client’ button and fill in their details. Then proceed as in the above paragraph. You should enter your organisations internal reference in the Reference field for cross-referencing purposes.

On the tablet being used by the client:
- Ensure the tablet is connected to the internet
- Go to hasi.com.au in the browser (preferably Chrome)
- Click ‘Subscribers’ and login, then select ‘Click for subscriber Area’
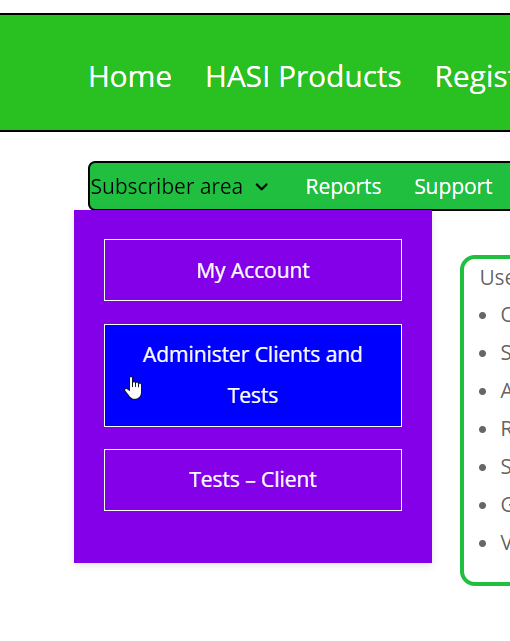
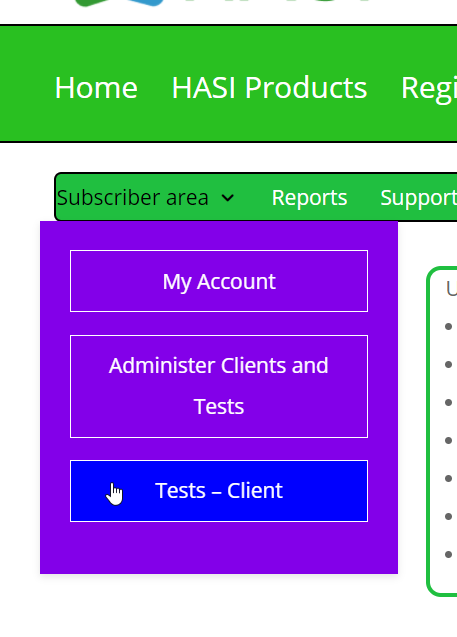
- Click the bottom set of 3 horizontal purple lines, then under ‘Subscriber area’ click ‘Test – Client’
- Enter the Client ID and Test Number obtained from the Laptop/Desktop and click ‘Next’
- Follow the instructions provided on the Laptop/Desktop

Action on test administrator’s laptop
Select Administer Clients and Tests from the Subscriber area menu
Find or if not in the system, add, the relevant client. On their record click the Run Test button.
Details of the client will be displayed along with the Date, Tester’s Position and Test Location to be filled in if required.
Click Next.
Action on test taker’s tablet.
Load the tablet browser (preferably Chrome).
Go to hasi.com.au -> Subscribers and log into the Subscriber’s area.
Under the Subscriber’s area click on Tests – Client.
You will now see what the Test Number is along with the Client ID.
Once you have the appropriate page up on the Test Taker’s tablet you can enter these details there.
Click Next.
Enter the Client ID and Test Number that have appeared on the Test Administrator’s laptop.
Click Next.
Instruct the test taker on how to do the Puzzle Test sample by following the instructions on your screen.
Once they know what they have to do, click the Go to Puzzle Test on your screen.
The Puzzle Test sample will appear on the tablet.
Have the test taker follow the instructions you read out from the Administrator screen so the test taker knows what is expected to complete the Puzzle Test.
When the Puzzle Test appears on the tablet, click the Start button on your screen to start the timer.
Do the Puzzle Test.
When the client has finished the Puzzle Test, click the Stop button.
Wait while the test uploads from the client tablet. Once done the Check button will appear.
Click the Check Button. Their test will appear on the Administrator screen with the correct answer overlaid. Dependent upon internet speed and usage you may have to wait up to 15 seconds.
If the test image does not appear as it is on the tablet, get the client to click the Resend button on the tablet and click the Recheck button at the bottom of the screen. If you do not get the full image, wait 5 seconds then refresh the page.
Ascertain whether or not they have completed the test successfully.
Click the Back to Instructions button at the bottom of the page.
Mark whether completed successfully or not.
Click the Go to Match Sample button
Wait for instructions from the administrator.
Instruct the test taker on how to do the Match Test sample by following the instructions on your screen.
Once they know what they have to do, click the Go to Match Test on your screen.
The Match Test sample will appear on the tablet.
Have the test taker follow the instructions you read out from the Administrator screen so the test taker knows what is expected to complete the Match Test.
When the Match Test appears on the tablet, click the Start button on your screen to start the timer.
Do the Match Test.
When the client has finished the Match Test, click the Stop button.
Wait while the test uploads from the client tablet. Once done the Check button will appear.
Click the Check Button. Their test will appear on the Administrator screen with the correct answer overlaid. Dependent upon internet speed and usage you may have to wait up to 15 seconds.
If the test image does not appear as it is on the tablet, get the client to click the Resend button on the tablet and click the Recheck button at the bottom of the screen. If you do not get the full image, wait 5 seconds then refresh the page.
Ascertain whether or not they have completed the test successfully.
Click the Back to Instructions button at the bottom of the page.
Mark whether completed successfully or not.
Click the Go to Odd One Sample button
Wait for instructions from the administrator.
Instruct the test taker on how to do the Odd One Test sample by following the instructions on your screen.
Once they know what they have to do, click the Go to Odd One Test on your screen.
The Odd One Test sample will appear on the tablet.
Have the test taker follow the instructions you read out from the Administrator screen so the test taker knows what is expected to complete the Odd One Test.
When the Odd One Test appears on the tablet, click the Start button on your screen to start the timer.
Do the Odd One Test.
When the client has finished the Odd One Test, click the Stop button.
Wait while the test uploads from the client tablet. Once done the Check button will appear.
Click the Check Button. Their test will appear on the Administrator screen with the correct answer overlaid. Dependent upon internet speed and usage you may have to wait up to 15 seconds.
If the test image does not appear as it is on the tablet, get the client to click the Resend button on the tablet and click the Recheck button at the bottom of the screen. If you do not get the full image, wait 5 seconds then refresh the page.
Ascertain whether or not they have completed the test successfully.
Click the Back to Instructions button at the bottom of the page.
Mark whether completed successfully or not.
Click the Go to Clock Test Sample button
Wait for instructions from the administrator.
Instruct the test taker on how to do the Clock Test sample by following the instructions on your screen.
Once they know what they have to do, click the Go to Clock Test on your screen.
The ClockTest sample will appear on the tablet.
Have the test taker follow the instructions you read out from the Administrator screen so the test taker knows what is expected to complete the Clock Test.
When the Clock Test appears on the tablet.
The Clock Test is not timed.
Do the Clock Test.
When the client has finished the Clock Test, click the Stop button.
Wait while the test uploads from the client tablet. Once done the Check button will appear.
Click the Check Button. Their test will appear on the Administrator screen. Dependent upon internet speed and usage you may have to wait up to 15 seconds.
If the test image does not appear as it is on the tablet, get the client to click the Resend button on the tablet and click the Recheck button at the bottom of the screen. If you do not get the full image, wait 5 seconds then refresh the page.
Click the Back to Instructions button at the bottom of the page.
Ascertain their score from the list provided in the instructions.
Enter their score.
Click the Finish button
Wait for instructions from the administrator.
Enter any relevant observations.
Click Save.
Finished.
